WordPress Essentials: How to Create a WordPress Plugin
The first step in developing your online presence is building a website. Your website serves as both the online headquarters for your business and the basis for many of your digital marketing initiatives.
A website used to be used exclusively to increase brand recognition. Today, a website includes everything from client landing pages to user interaction. Because of bespoke WordPress development, this is only possible.
WordPress is considered to be the best choice for designers and business owners looking to boost sales and advertise a particular product online. Its extremely user-friendly platform and comprehensive feature set make it possible for it to manage and draw in a large number of online marketers from all over the world.
The open-source nature of WordPress is one of the main factors contributing to its success. For this widely used Content Management System, more than 50,000 plugins have been produced (CMS).
WordPress themes enhance your website’s visual appeal, whereas plugins alter its functionality. It means that changing and managing plugins is an easy way to lessen the effects of updates and increase the adaptability of the web. Additionally, it is simple to install and use with the aid of skilled developers. However, you might be wondering how to create your own WordPress plugin.
WordPress, fortunately, makes the process simpler. There will be some coding involved, but making a simple plugin for your website is not difficult. You can do this too, among other things, to give your stuff more utility.
This article will discuss how you can develop your first WordPress plugin. Let’s start with the basics!
What is a WordPress plugin?
A WordPress plugin is a program that “plugs into” your WordPress site. Plugins can add a new feature to your site or enhance existing capabilities, allowing you to create almost any type of website, from eCommerce stores to portfolios to directory sites. Depending on their functionality, plugins might make minor modifications to your site or major ones.
For instance, you might use a plugin to translate your website fully or to include a WhatsApp share button. Alternatively, if you run an online store, you might add a plugin to assist with payment gateways or let customers make reservations online.
Additional plugins are available that, among other things, can help you enhance your contact forms, develop eye-catching sliders, back up your website in case of data loss, and simplify email opt-in.
Also Read: Website Building Guide for SMBs to take the First Step into Digitization
While many make changes to your site’s front end, some alter the back end to facilitate better maintenance by your team. For instance, these plugins might let you perform A/B testing, scan your website for broken links, or put it in maintenance mode.
Now that we are more aware of what plugins are, let’s look more closely at how they operate.
How Do WordPress Plugins Work?
WordPress is designed so that other programmers can add their own code to it. A large selection of hooks and filters are available in the WordPress plugin API, enabling developers to change or supplement the existing WordPress functionality.
- The WordPress database can be used by WordPress developers to store data.
- WordPress content types, taxonomies, and custom fields can all be used by plugins to hold data beyond just posts and pages.
- The WordPress database stores each plugin that you install on your website.
- You have complete control over when to turn them on and off.
- Each time you visit, WordPress establishes a connection to the database, loads the core software, and then loads any active plugins.
- Before being provided to the user’s browser, all of this code is processed on your server.
The Major Elements of WordPress Plugin You Need to Know:

You must first comprehend how the major systems operate in order to design your own plugin. Programming hooks allow one piece of code to communicate with (or “hook into”) another. Actions and filters are the two categories into which hooks in WordPress are divided. Below, we’ll go over these in more detail along with two other elements that are typically used in plugin development.
1. Actions:
A WordPress action is a specified event that will take place at a specific time. You can increase or decrease your plugin’s functionality by using actions. Once an action is initiated, the functions that are associated with it will be used.
WordPress actions include saving posts, for instance. The do action function defines actions. They need the $tag parameter (the action’s name), and perhaps $args (additional arguments expanding what the action does).
Numerous predefined actions are present in the WordPress core. But you can create your own. In either scenario, when building your WordPress plugin, you’ll use the do action to set settings for your hooked function. The function will then be connected to a certain action using the function add action.
2. Filters:
A single variable or a group of variables can be modified by WordPress filters before being returned. To put it simply, filters let you modify the material that people see.
WordPress filters are created by utilizing the apply filters function, which defines and creates filters. They ask for the $tag (filter name) and $value (filtered value or variable) arguments, with the option of also accepting the $var for additional function values.
You are able to create your own filter by using the apply filters hook. Use the add filter function after that to run it. By doing so, you can alter the variable and return it while also connecting a particular function to the filter.
3. Shortcodes:
Simply put, shortcodes are user-facing pieces of code that let users create and display custom functionality to website visitors fast and efficiently. The editor allows for the addition of shortcodes to menus, widgets, posts, and pages.

Many plugins make use of shortcodes. You can create your own shortcode by employing the add shortcode method. Your shortcode’s name will be the first variable, and the output function will be the second. The output function has three values: attributes, content, and name.
4. Widgets:
WordPress widgets are an additional method for enabling plugin functionality via a straightforward interface. You can make a widget by extending the WP Widget class. With an object-oriented design paradigm, which means that methods and values are contained in a single entity of a class, WordPress supports widgets.
To better understand how plugins function, we advise reading up on these topics before beginning your WordPress plugin creation.
How to Create Your First WordPress Plugin?
Now that we’ve covered the principal elements of WordPress plugin development, let’s get into how you can make one. It’s critical to remember that before adding a new plugin to your website or modifying any files, you should first create a testing environment or staging site. This allows you to explore without risking breaking your live site.
Step 1: Choose a Plugin Name:
Choosing a proper name for your plugin is the first step in creating a WordPress plugin.
- Choose a unique one that is also pertinent to the plugin’s function.
- To make sure there aren’t any other plugins with the name you’re considering using, it’s a good idea to search Google and the WordPress Plugin Directory.
- Keep in mind that the PHP file and plugin’s folder will both use the name you gave when you created it.
- To avoid naming collisions (which we’ll explore later), you can wind up using an abbreviated version of the plugin’s name as a prefix. That is why you should choose a name that may be simply abbreviated to produce a unique identity.
Step 2: Create Your Plugin Folder and PHP File:
Your plugin needs a home in the first place. So, after choosing a name for your plugin, the next step is to create a folder for it.
- Go to the wp-content/plugins folder in your WordPress installation to get started. Create a new folder and give it the plugin’s name, separating words with hyphens (for instance, “your-plugin-name”):
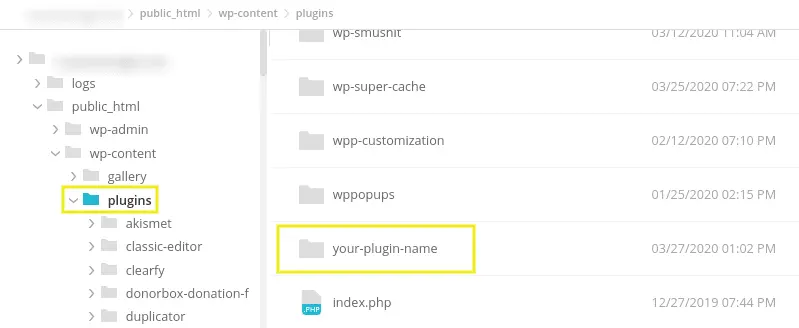
Source: https://wpbuffs.com/
- You must develop a PHP file inside your plugin folder after creating it. The same naming pattern as before should be used (for instance, “your-plugin-name.php”):
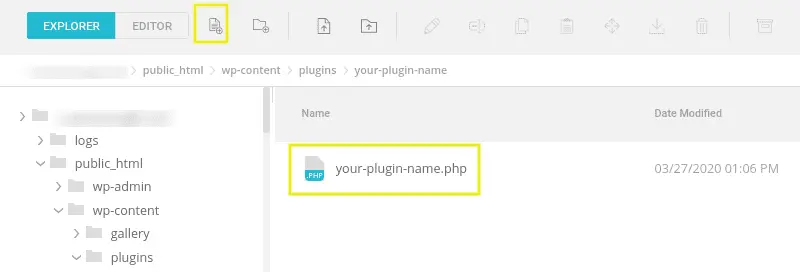
Source: https://wpbuffs.com/
- Depending on how complicated your plugin is, it can have just one PHP file or a lot of them. For language, CSS, and other things, you might have separate files.
Step 3: Add Your File Header:
Once you’ve completed making your main plugin file, it’s time to add the file header. Simple metadata about your plugin is included in this PHP block comment.
Add the following code to the file:
/**

* Plugin Name: Your Plugin Name

* Plugin URI: http://yourdomain.com

* Description: Insert a brief description of what your plugin does here.

* Version: 1.0.0

* Author: Your Name

* Author URI: http://yourdomain.com

* License: GPL2

*/
Of course, you’ll want to add the details unique to your plugin to the information above.
- In addition, only include this header in one of the PHP files in your plugin directory.
- The name of your plugin must be included in this header at the very least. But you can use this area to mention the author, the license, and other things.
- Save your work after you’re done. Your plugin should now be installed on your WordPress website.
- Go to your WordPress admin panel and click on Plugins to confirm:
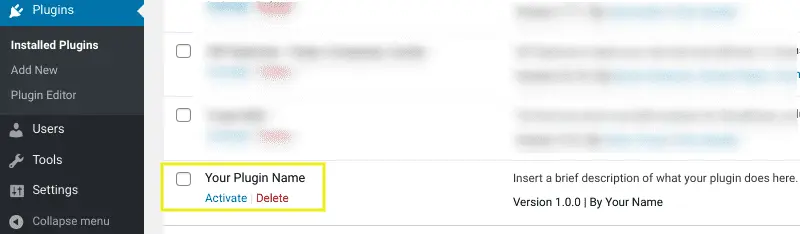
Source: https://wpbuffs.com/
- Your new plugin ought to be visible on this screen. There is surely more work to be done.
Step 4: Design Your Plugin to Add Functions:
Now that you’ve laid the groundwork for your plugin. It obviously accomplishes nothing right now though. You must program your plugin using the elements described earlier in this tutorial in order to achieve this.
To cover all of the different ways to create and use plugins in a single post would be impossible. We advise checking the WordPress Codex if you need help writing the code for your plugin.
Also Read: Get the Best from WordPress in 2021 Using These Awesome Plugins
Keep in mind that you might want to create several files for your plugin. For instance, you could make distinct CSS, JavaScript, image, and other files. Even while it’s not necessary, this can be very helpful for organizations, especially if your plugin does a variety of tasks. You will compress the files before submitting them to your website if you do end up with a lot of them.
Step 5: Compress Your Plugin Folder:
A PHP file that you upload to the WordPress plugin’s directory causes the plugin to be instantly installed on your website. However, if you’re writing the PHP code for your plugin, you can also utilize a text or code editor. One of the best tools for creating WordPress plugins may be this one.
Before submitting your plugin to your WordPress website, you must first convert it to.zip format. As a result, you can compress the plugin folder once you’ve completed adding all of the code you want to include. Normally, you may do this by selecting Compress from the right-click menu of the folder.
Step 6: Activate and Run the Plugin on Your WordPress Site:
When you’ve finished the initial draught of your plugin, you can finally start utilizing it on your WordPress site! If you haven’t already, you can add it to your WordPress installation by uploading the folder to your plugin’s directory.
If you have the plugin in a .zip folder on your computer, you may add it to your WordPress dashboard by going to Plugins > Add New > Upload Plugin > Upload Plugin > Choose a file:
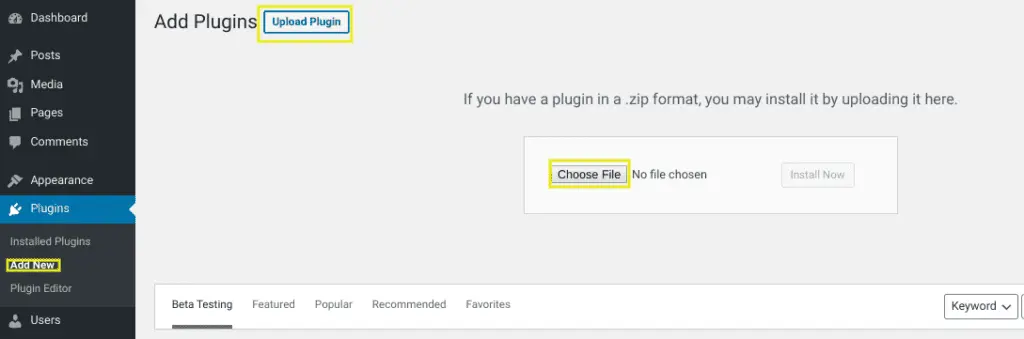
Source: https://wpbuffs.com/
If the plugin is already installed, go to the Plugins screen and click the Activate button. Then you may start testing your plugin and making changes and improvements as needed.
Best Practices for WordPress Plugin Development

To create the finest plugins for your WordPress website, you must try the following concepts, regardless of your level of experience as a plugin developer.
1. Create a Solid Plan:
The best course of action is to take a step back and build a sound strategy rather than immediately starting plugin development.
To understand your audience better, poll potential users.
- What advantages will the plugin offer?
- Will it make the website more easily accessible?
- Will it facilitate navigation for your users?
- Is the additional time spent beneficial?
Once you have the answers to these questions, you may start building the plugin.
It’s also essential that you look through the official WordPress plugin repository for any relevant plugins.
If so, you don’t have to start from scratch with a plugin. Instead, you may start focusing on a different plugin. You also have the option to outsource WordPress plugin development, you can reach out to companies like Imenso software and hire the best WordPress developers to make your success hassle-free.
2. Follow the Coding Principles of WordPress:
It should become part of the routine for WordPress developers to work with the WordPress Coding Standards in mind.
When writing scripts for the creation of WordPress plugins, pay particular attention to the spacing, variable names, indenting, and brief comments. This will reduce errors and make it simple to understand, edit, and debug your code. Consult the WordPress Coding Standards handbook for a good place to start.
To prevent your plugins from getting confused with other already-existing ones, it is best to give them a special prefix. To distinguish your plugin from the countless other options, add one or two adjectives.
3. Resort to Boilerplate Code:
If you don’t want to create your own code from scratch, you can start with a boilerplate.
But what does boilerplate code actually mean?
A collection of directories and source code files that can be utilized in project development is referred to as boilerplate, also known as boilerplate code. These directories systematically group and arrange the source code files. You can arrange your code this way and keep errors at bay.
The source code files for WordPress plugins include placeholder function definitions, code comments, and values. In addition to gaining better code, maintenance, and development, other people can contribute to your work and raise the quality of the plugin.
4. Invest in Plugin Security:
A plugin that is poorly made can endanger your WordPress website. Because of this, WordPress developers take extra care to make sure their plugins are secure.
Familiarise yourself with:
- esc_url_raw
- esc_url
- esc_attr
- esc_html
- wp_filter_kses
- esc_textarea
- wp_insert_post
- $wpdb->insert
- $wpdb->update
You can use them to sanitize the data and guard against SQL injections. Use Nonces to protect the plugin from cross-site request forgery attacks. Additionally, validation and sanitization will shield your plugin from any user-provided data.
Another WordPress plugin security check is to make sure that everyone on your team is on the same page. When creating restricted plugin functionality, it is best to assign admins roles.
Ask for the directory to be password-protected if the plugin uses it to store user files. Additionally, getting rid of any unnecessary or unused plugins is a smart idea.

5. Maximum Clarity in Folder Structure:
It is best to follow a consistent folder structure when designing a plugin in WordPress. This will not only make it easy for you to comprehend the entire procedure, but it will also make it easier for your team to stay on track.
Try to store similar sorts of files in the same location. Images in the /images folder, for example.
You can use the following sample folder structure as a standardized reference.
/plugin-name
plugin-name.php
uninstall.php
/languages
/includes
/admin
/js
/css
/images
/public
/js
/css
/images
6. Reach a Global Audience:
Because your WordPress website will be accessible from anywhere in the world, you should think about internationalizing your plugins. This will allow you to reach your target audience even outside of your home country’s borders.
You can accomplish this by writing in proper English sans slang. Avoid inserting odd control characters and markups, as well as unnecessary HTML markup, into a translated string.
Text domains, domain routes, basic pluralization, and more approaches are also available. To learn more about WordPress internationalization, consult the WordPress Internationalization Guide.
7. Readme.txt File is Crucial:
In order to release your WordPress plugin, a readme.txt file must be included. An insufficient readme.txt file may suggest plugin code issues. Furthermore, it may represent the WordPress plugin developer’s lack of attention to detail.
You can demonstrate the features of your plugin in the readme.txt file. Additionally, it makes it easier for users to quickly install and use your plugin. If your plugin provides enough details, even a user is more likely to download it. A readme.txt file benefits everyone in certain ways.
Wrapping it Up
WordPress, as an open-source platform, allows you to create your own plugin and share it with other users. WordPress’s simple and clear coding makes it simple for various search engines to read the website content in a well-defined manner. Furthermore, each page, image, and article has its own set of keywords, descriptions, and titles.
This leads to the best optimization search. We can also add tags to improve or boost our optimization efforts for better results in terms of website traffic.
We hope this article helped you learn how to create a WordPress plugin. While some coding experience is beneficial, you should hire professional WordPress plugin developers for your company. Contact Imenso Software via their website for a free quotation.


Similar Posts
Wix Vs WordPress: Which One to Choose For Your Business Website?
Trying to choose between WordPress and Wix to build a website for your new business? Before you move forward we should warn you that our work is mostly on WordPress so our loyalties are already decided. But still, WordPress is not the only way to build a website. (Although it does power 40% of all the websites on the internet) ...
Website Building Guide for SMBs to take the First Step into Digitization
Are you a small-business owner? Do you want to reach more customers? A website with an intuitive interface is essential for small businesses, and a website can help you grow and succeed. Learn more about how a website for a business can help you rise above the rest....
WordPress Vs Magento – Which One to Pick For Your Ecommerce Store In 2021
While starting a new eCommerce store, one dilemma for every entrepreneur and SMB owner is, which platform to choose between WordPress and Magento. Even though there is a myriad of eCommerce services available, the final pull is between WordPress and Magento. ...